Not quite a food post....but it's still a cake.....

My dear sweet friend Danuta had invited me to her baby shower so this was a great opportunity for me to try make a nappy cake. It's fiddly I must admit but if I can do it, so can you. I did need a couple more hands to help me out (while I took photos of course) but other than that it's achievable.
Danuta and I have known each other since kindy, we went to primary, high school and uni together and she was one of my 5 bridesmaids. We've also lived on the same street together for the past 23 odd years. Some of my fondest memories were spent with her, her sister (Teresa - who also did an awesome job organising the baby shower!) and I in my front yard chatting and playing Big 2 after school and on the weekends......good times they were : ) So she's a special friend of mine and deserves a special gift. Ok enough of the soppy stuff.....onto the nappy cake.....
What you need
- Newborn nappies (a box of huggies has 108 nappies but I think I used around 40-50. Depends on on how big and how many tiers you want)
- A box of rubber bands
- Maybe a dowel to hold the tiers in place (although I used the cardboard roll from the cellophane)
- Sticky tape
- String
- Ribbons
- Cellophane
For the base you can buy a cake base but I just cut up a nappy box and folded it over to make sure it's thick and strong, then covered it with foil.


Secure with a rubber band
Space the rubber band out so the nappy holds it's shape better and more securely (not necessary, but I can be a bit anal....)
My dear sweet friend Danuta had invited me to her baby shower so this was a great opportunity for me to try make a nappy cake. It's fiddly I must admit but if I can do it, so can you. I did need a couple more hands to help me out (while I took photos of course) but other than that it's achievable.
Danuta and I have known each other since kindy, we went to primary, high school and uni together and she was one of my 5 bridesmaids. We've also lived on the same street together for the past 23 odd years. Some of my fondest memories were spent with her, her sister (Teresa - who also did an awesome job organising the baby shower!) and I in my front yard chatting and playing Big 2 after school and on the weekends......good times they were : ) So she's a special friend of mine and deserves a special gift. Ok enough of the soppy stuff.....onto the nappy cake.....
What you need
- Newborn nappies (a box of huggies has 108 nappies but I think I used around 40-50. Depends on on how big and how many tiers you want)
- A box of rubber bands
- Maybe a dowel to hold the tiers in place (although I used the cardboard roll from the cellophane)
- Sticky tape
- String
- Ribbons
- Cellophane
For the base you can buy a cake base but I just cut up a nappy box and folded it over to make sure it's thick and strong, then covered it with foil.
Finally, you'll need various baby items to decorate (I used 3 pack baby blanket, thermometer, baby lotion, baby oil, cutlery set, socks and a hooded towel)
Lay the nappy face down with the "open" side towards you
Roll it up towards the "closed" end

Roll it up towards the "closed" end
Secure with a rubber band
Space the rubber band out so the nappy holds it's shape better and more securely (not necessary, but I can be a bit anal....)
The stack of nappies
Bottom tier - surround the cardboard roll with the nappies and secure with rubber band

Add more nappies and tie a string around to keep them in place

Before you cover the bottom tier, start on the middle tier (trust me, it's just easier to do this now). Slide this off so you can cover the bottom tier with a blanket
Another view
Wrap the blanket around the bottom tier like so...
Make sure you gather it around the roll neatly (and in our case the blanket wasn't long enough to go the full way around so we cut some blue paper just to hide the nappies....again not necessary but yeah....anal....)
More example of the gathering
Yeah I think you guys get the picture now

Secure a rubber band at the top

Remember how we started on the second tier before? Well slip that back on now

Wrap the second tier with another blanket, tie it up with string

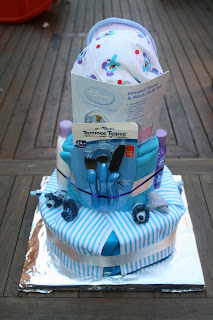
Top tier - I used the hooded towel as my top tier and shoved the last blanket at the top to hide the carboard roll
Using larger ribbon (maybe 2cm width) tie them around each tier to hide the string. Then place your baby items all around and secure with smaller ribbon

Roll it up towards the opening

Make sure there is the "bud" forming

Once you get to the end, fold the opening inside out covering the base of the flower

Sock rose or flower


Pin the sock roses carefully onto the blankets (as you don't want to pierce any nappies) and voila!


Bottom tier - surround the cardboard roll with the nappies and secure with rubber band
Add more nappies and tie a string around to keep them in place
Before you cover the bottom tier, start on the middle tier (trust me, it's just easier to do this now). Slide this off so you can cover the bottom tier with a blanket

Another view
Wrap the blanket around the bottom tier like so...
and tie string around the bottom tier to keep the blanket in place
Make sure you gather it around the roll neatly (and in our case the blanket wasn't long enough to go the full way around so we cut some blue paper just to hide the nappies....again not necessary but yeah....anal....)
More example of the gathering
Yeah I think you guys get the picture now
Secure a rubber band at the top
Remember how we started on the second tier before? Well slip that back on now
Wrap the second tier with another blanket, tie it up with string
Top tier - I used the hooded towel as my top tier and shoved the last blanket at the top to hide the carboard roll
Using larger ribbon (maybe 2cm width) tie them around each tier to hide the string. Then place your baby items all around and secure with smaller ribbon

But wait there's still more!
Sock Roses!
Roll it up towards the opening
Make sure there is the "bud" forming
Once you get to the end, fold the opening inside out covering the base of the flower
Sock rose or flower
Pin the sock roses carefully onto the blankets (as you don't want to pierce any nappies) and voila!


haha that is all kinds of awesome! particularly love the pics where the baby in the background is staring at you/the cake so happily!
ReplyDeletewow great, thanks for this photos, you will give me some tip how to create a diaper cake.
ReplyDelete________________
Mickey Buarao
Thankyou for this Brenda! I've always wondered how these were constructed! :)
ReplyDeleteHow fantastic! I never even thought to attempt this. It just looked way to hard. I think I'll have to give it a go for the next baby shower. Thanks!
ReplyDeleteHi Suze - Aren't I mean! Ditch the baby in the bouncer and there's proof too! LOL
ReplyDeleteHi Mickey - I'm glad I was able to help somehow : )
Hey Lorraine - My pleasure : )
Hi Claire - Thank you! I'm sure yours will look lovely : )
Hi,
ReplyDeleteThat is so creative...wow...amazing...:)
Dr.Sameena@
www.myeasytocookrecipes.blogspot.com
Fantastic!!! My niece is having a baby shower soon & I definately am going to make her a diaper cake.
ReplyDeleteThanks for sharing!
Every website I look at just has instructions - no picutres, This is great!I have so much more confidence that I can make it now, and even better - I need an Eeyore one too!
ReplyDeleteThanks for sharing! :)
Thank you so much for the instructions for the diaper cake. It looks easy and I will try to make it for my friend who is having her first baby soon. Jan - Sydney Australia
ReplyDeletethat nappy cake is fantastic!! and the sock roses too. I've wanted to make one for ages but didn't want to have to buy a book on how to do it. And the pictures make it so much easier to refer too for later on.
ReplyDeleteOh and I couldn't help but giggle at the cute baby in the back ground of the pics making faces....