Friday, December 31, 2010

Sushi Christmas Presents (using the Rice Cube)


What is a Rice Cube? It's an awesome kitchen gadget that shapes the rice into a cube in about 4 easy steps.
So what did I decide to make? Sushi Presents for our Christmas lunch. We were already planning a massive hot dinner so something cold and light for lunch was the way to go.

Place some sushi rice in the contraption

I added my regualar sushi tuna mix in the middle (recipe here)
And topped it with some more rice
Watch the video here to see how the device works

Push, fold, push, slide and there you have it....

I cut up some nori sheets and wrapped it around each side, then made a nori bow....
Using a strip of nori, wet the ends and stick it together to form a circle (like picture). Pinch the middle and wrap a small bit of nori around the centre and place it on the top of the rice cube

And that's my Sushi Present
By the 4th attempt I was definitely getting better


Merry Christmas!
I hope you all had a wonderful Christmas filled with love and laughter and of course lots of food : )
What a fabulous year we've had and I thank everyone for taking the time to read my blog. Looking forward to the new year for more cooking and eating!
xoxoxo

Saturday, December 11, 2010

Jimmy's Satay and my Bok Choy Noodles

Good 'ol Jimmy's!
We use it for Satay Chicken, adding to the soup of Steam Boat to give that extra POW! and also just as a plain dipping sauce. This post I've used it as an accompaniment to my stir fried Bok Choy Noodles. And the noodles would be nothing without Jimmy's.

Ingredients
2 Bok Choys (cut in segments)
4 bundles of dried noodles
1 tablespoon of oil
3 cloves of garlic
3 tablespoons oyster sauce (I usually add more after tasting)
200g ham (or any cooked meat)
Jimmy's Sate Sauce
Chilli Sauce
Method
1. Fill a large pot with water and bring it to the boil (in my case I used a frying pan so I didn't have to wash up extra).
2. Meanwhile cut the Bok Choy and rinse really well.
3. When the water is boiling, throw the Bok Choy in and only cook it for around 30 seconds. Take it out and let the water come to a rapid boil again.
4. Throw in the noodles and cook (around 4mins)
5. Drain the noodles, rinse with cold water.
6. Heat the pan up again. Add the oil. Add the garlic.
7. Shake off excess water from the noodles and then place it in the hot pan (you may need to add more oil, but again personal preference here), add oyster sauce and stir well.
8. Add the ham and the Bok Choy and cook a further 2mins (constantly stirring or tossing).
9. Plate it and add some Jimmy's and chilli sauce on the side. Enjoy!

Bok Choy

Dried noodles
(use a chopstick to loosen the bundles)

Garlic
Oyster Sauce
Ham

Bok Choy - all in!

Add a splash of Jimmy's and chilli sauce
Mix mix and there you have it


Wednesday, December 8, 2010

Mr Dduckbocki Miss Kkochi

Do you know my obsession with deep friend doughey goodness? Well yeah it's something I'm not proud of, but it is my weakness. And to make it even better....shove it on a stick! Mmmmmmm oh how I love you Pluto Pup/Dagwood Dog and who does it best? The Koreans with their panko breadcrumbs......

$3.00

I enjoy these a little too much. And unfortunately I live rather close and do succumb to them quite often. Ohhhhh but they are sooooooooo good! And there is a range of other stick foods on offer too. There are the spicy rice cakes, plain frankfurt, dim sum, gyoza, and heaps more.

Perfect for a late night snack. Make a selection through the viewing window and off you go


The Boulevarde, Stathfield

Wednesday, December 1, 2010

"Eat Me" Cookies (Inspired by Alice In Wonderland)

I have this friend Steph.....well she's more than just a friend. She's my confidant, my advisor, tech/IT/FB support, shoulder to cry on, mothers group buddy, basically she's my go to girl. If I need something, she's there in a heartbeat. Maybe not always in person because we don't live that close to each other anymore....but she's just a phone call away.

So Steph was turning 30 and had invited me to her Alice in Wonderland themed birthday party and I had promised to make her a giant cupcake (which turned out to be a bit of a fail because it went all droopy on me - photo proof will be at the end of this post). Luckily I also decided to make cookies, of course Alice in Wonderland inspired ones that say "Eat me" or "Try me" he he he.

You can find the recipe here. Yes it's another Martha Stewart one....she's awesome!

The flour mixture
Creaming butter and sugar

Add the flour mixture into butter and sugar and watch it transform

Mix mix....

Until it forms a dough

Whoops forgot to take photos before I baked
Oh well....here are the baked photos

Royal icing in snap lock bags

Pipe the edges first and allow them to dry (around 30mins)

With the remaining icing, mix a tiny bit of water in it but make sure it is still stiff and not runny! Very important as I found out (takes twice as long to dry and also creates air bubbles)
Spoon the icing onto the cookies (the dried edges works as a barrier to stop the icing running over the side). Again allow to dry

Using white icing, pipe your words


And the party.....Steph and Carlos did such a fabulous job! Look at the decorations!


The bar area....mmmmm loved the Strawberry Martini

Oh and as promised.....here is my melting giant cupcake.....traggic isn't it?

Happy 30th birthday Steph!
Thanks for being such an awesome friend : )
xoxoxo

Thursday, November 18, 2010

Rainbow Cookies


I know I've been terrible with the posts lately. I've taken a breather and looked to my inner child and this is what I come back with....the rainbow cookie.


I've seen the rainbow cake doing the rounds so I thought I'd try a rainbow cookie instead. Great for the kids to get involved and also the inner child in me. Requires a little bit more elbow grease as you have to work the colour through the dough but it's worth it when the kids see the end result. So much fun (a great excuse to get a bit messy with the flour and just enjoy it.....well for the kids anyway....mop and bucket for me afterwards was not so fun)

Work it!
The colours
Rolled and ready for the oven

Straight out of the oven

And the kids cookies (the big one I made hehe)
The Jordster on the left and The Keanster on the right with his one lone cookie


Rainbow Cookie Recipe
- 200g room temperature butter
- 1 cup white sugar
- 1 egg
- 1 teaspoon vanilla bean paste (or vanilla essence)
- 2 cups plain flour
- At least 4 different colour food dyes
Method
1. Using the paddle attachment mix the butter, sugar, egg and vanilla.
2. Pour in the plain flour and mix again.
3. Divide into four balls.
4. Mix a different colour for each ball.
5. Flour the work bench and roll each ball out into a snake.
6. Place 2 snakes together (parallel), then the other 2 on top (so when you go to cut it you will have all four colours)
7. Cut along the snake (2cms thick) and roll each one out and press it down on the baking pan.
8. Bake at 180 degrees for 10-15mins

Monday, October 25, 2010

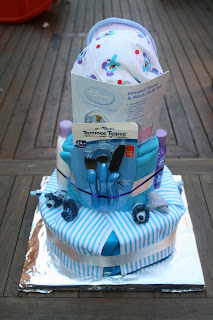
How to Make a Nappy Cake (and Sock Roses)

Not quite a food post....but it's still a cake.....


My dear sweet friend Danuta had invited me to her baby shower so this was a great opportunity for me to try make a nappy cake. It's fiddly I must admit but if I can do it, so can you. I did need a couple more hands to help me out (while I took photos of course) but other than that it's achievable.

Danuta and I have known each other since kindy, we went to primary, high school and uni together and she was one of my 5 bridesmaids. We've also lived on the same street together for the past 23 odd years. Some of my fondest memories were spent with her, her sister (Teresa - who also did an awesome job organising the baby shower!) and I in my front yard chatting and playing Big 2 after school and on the weekends......good times they were : ) So she's a special friend of mine and deserves a special gift. Ok enough of the soppy stuff.....onto the nappy cake.....
What you need
- Newborn nappies (a box of huggies has 108 nappies but I think I used around 40-50. Depends on on how big and how many tiers you want)
- A box of rubber bands
- Maybe a dowel to hold the tiers in place (although I used the cardboard roll from the cellophane)
- Sticky tape
- String
- Ribbons
- Cellophane
For the base you can buy a cake base but I just cut up a nappy box and folded it over to make sure it's thick and strong, then covered it with foil.
Finally, you'll need various baby items to decorate (I used 3 pack baby blanket, thermometer, baby lotion, baby oil, cutlery set, socks and a hooded towel)

Lay the nappy face down with the "open" side towards you
Roll it up towards the "closed" end

Secure with a rubber band

Space the rubber band out so the nappy holds it's shape better and more securely (not necessary, but I can be a bit anal....)

The stack of nappies
Bottom tier - surround the cardboard roll with the nappies and secure with rubber band

Add more nappies and tie a string around to keep them in place

Before you cover the bottom tier, start on the middle tier (trust me, it's just easier to do this now). Slide this off so you can cover the bottom tier with a blanket
Another view

Wrap the blanket around the bottom tier like so...
and tie string around the bottom tier to keep the blanket in place

Make sure you gather it around the roll neatly (and in our case the blanket wasn't long enough to go the full way around so we cut some blue paper just to hide the nappies....again not necessary but yeah....anal....)
More example of the gathering

Yeah I think you guys get the picture now

Secure a rubber band at the top

Remember how we started on the second tier before? Well slip that back on now

Wrap the second tier with another blanket, tie it up with string

Top tier - I used the hooded towel as my top tier and shoved the last blanket at the top to hide the carboard roll

Using larger ribbon (maybe 2cm width) tie them around each tier to hide the string. Then place your baby items all around and secure with smaller ribbon

But wait there's still more!
Sock Roses!

Lay the sock down with the toe part towards you

Roll it up towards the opening

Make sure there is the "bud" forming

Once you get to the end, fold the opening inside out covering the base of the flower

Sock rose or flower


Pin the sock roses carefully onto the blankets (as you don't want to pierce any nappies) and voila!

Side view

Back view

Other side view

Cover it in cellophane and tie the top off with ribbon and you have your nappy cake


Congratulations Danuta and Simon!
May your little man be blessed with good health, a loving soul and a happy life : )
xoxoxo